
Clogs & Platforms Shoes: Elevating Women Through the Ages
OTTOMAN WOMAN’S MOTHER-OF-PEARL INLAID WOODEN, STILTED CLOGS or Qabqab; Ottoman Turkey, 19th or early 20th century, 30 cm high to top of toe strap, 22.8 cm long and 18 cm wide. This type of decorative geometric inlay is also used on furniture and objects like wooden chests. Courtesy of Michael Backman, London.
During the spring of 2019, I was able to view "Empresses of China’s Forbidden City, 1644 - 1912" at the Freer/Sackler, showing the opulence of dress in Qing Dynasty China. A month later, while reviewing the Guo Pei exhibit at the Bowers Museum, the opulence of the rich in contemporary China was revealed (see *Ornament* 41/2, 2019). That same May, Michael Backman, a London based purveyor of fine ethnographica, showed a pair of Ottoman woman’s clogs, along with detailed attribution and a vintage postcard of such clogs being worn. All of a sudden, their common theme emerged, of how the status of women has long been determined by the shoes they wore.
We have always covered shoes as an essential part of personal adornment, but the footware encountered in these exhibitions and online literally elevated women, physically and socially. More than two decades ago, the Field Museum of Natural History opened a wonderful exhibition called “Living Together,” designed to promote better understanding of cultural diversity (Liu, Ornament 24/4: 68-69, 2001). This exhibit introduced me to clogs, both practical, as in the example of Japanese rain clogs of the early 20th century, and opulent ones, possibly dangerous to the wearer, of Turkish women’s stilted clogs of the same period. Both of wood, but the Turkish ones were elaborately inlaid with mother-of-pearl, and almost twice as high as the Asian ones.
Backman showed in his monthly newsletter an unusually tall Ottoman woman’s mother-of-pearl inlaid wooden clogs, also stilted. Called Qabqab in Arabic; Ottoman Turkey, 19th or early 20th century, 30 cm high to top of toe strap, 22.8 cm long and 18 cm wide. This pair of woman’s clogs (qabqab or nalin) is most probably from Ottoman Turkey or possibly from elsewhere in the Ottoman empire. They are very high – in fact they are among the tallest examples of this type of footwear that they have seen. Each comprises two high platforms which flare to be quite wide towards the ground, a sole, and the original raised upper metallic strap. (The undersides of the straps have been reinforced relatively recently with what seems to be a vinyl material to protect and better support the straps.) Each is carved from wood (possibly olive wood) and inset with numerous mother-of-pearl slivers arrayed in geometric patterns along with silver or pewter wire inlay. This decoration is across all exposed wooden surfaces and is quite profuse.

TURKISH WOMAN’S STILTED CLOGS, of wood, mother-of-pearl inlay, cloth and gold (?) fiber; early 20th century. Note that the shape of the clog sole does not conform to the shape of the human foot. In these Turkish and also Qing Chinese clogs or platform shoes, the elevating portions widen at right angles to the sole, to provide a more steady base for the footwear. In contemporary Western or Chinese shoes, the platform is in line with the sole and the foot. Courtesy of The Field Museum of Natural History, previously published in Ornament (24/4, 2001).
Such clogs were designed for a wealthy woman so that when worn she would be elevated above a wet and dirty floor. Walking, however, required the assistance of an attendant, and the higher the clog, then the more attendants who would be needed, so particularly high clogs – such as those shown here, which must be among the highest available – became status symbols. Their Arabic name – qabqab – derives from the sound they made when they were being worn. The pair is in very good condition, with no losses to the mother-of-pearl inlay. As mentioned, the toe straps have newer reinforcements. (It is of considerably different shape compared to the pair from the Field Museum.) See: Koc, A., et al, Istanbul: The City and the Sultan, Nieuwe Kerk, 2007.
Empresses of Qing China, as well as other consorts of the Emperor, also wore elevated shoes, of two types: very thick, stiff soles on shoes or boots or shoes with platforms, both shown here. Since the Qing rulers were Manchurians, they did not permit the binding of the feet of their women, as did the Han Chinese of that time. This painful and crippling practice produced a “lotus gait”, which titillated men of earlier dynasties (Wang and Stuart (eds) 2018 Empresses of China’s Forbidden City, 1644-1912. Yale University Press). Apparently, the Manchurian platform shoes allowed an approximation of the above gait. In the book accompanying this Smithsonian exhibition, there are a number of paintings of Qing empresses wearing platform shoes, most with the soles tapering to about half the length of the shoe. But there is a photograph of the Empress Dowager Cixi, the last empress, wearing the flaring type of platform shoes as shown in this blog. Of course, those who wore such elevated shoes were surrounded by a retinue, who would be expected to steady her walk.
When we look at the new empresses of China, that is, ultra-wealthy women, I have no information whether any in the exclusive circles of Guo Pei’s fashion group do actually buy and wear her shoes. But if they do, you can bet onlookers will realize their status.
Worldwide, high heels or platform shoes are associated with glamour, high fashion and sexuality, although they do come with a cost. Injuries from high heels have increased, almost doubled, and longterm wearing has deleterious effects on the toes, foot, ankle, legs and spine. I am not sure if elevated shoes still confer status in our contemporary world, but there does not appear to be any decline in their desirability nor cost.
Related Readings: Guo Pei. Couture Beyond. Volume 41, No. 2, 2019.
TWO PAIRS OF QING WOMEN’S PLATFORM SHOES, with embroidered silk satin cloth uppers, appliqué and tassels. The platforms are wood core covered with cotton and have sewn on or glued on glass beads or jewels. The uppers have similar bead decoration, probably sewn on. Pair to right have tiger heads and the Chinese character for king (wang) in red. Its platform has the character for longevity in glass ornaments. Children’s shoes and hats have similar tiger motifs (Liu and Najdowski, Ornament 38/2, 2015). Tiger hats for boys also have the word for king sewn on the forehead but lack the tassels for whiskers. Courtesy of the Freer/Sackler.


PLATFORM SHOES WORN BY MANNEQUINS at the Guo Pei exhibition, Bowers Museum, Santa Ana, California. These are not the tallest of the platform shoes that accompany all of Chinese designer Guo Pei’s clothing. Some are as high or even slightly higher than the Backman Ottoman clogs. Unfortunately none of the shoes are described in the publication, Guo Pei, Couture Beyond. The one to the left appears to be of vinyl and a rigid plastic, embellished with beadwork (?) and strands of small beads, somewhat similar in treatment to the two pairs of Qing platform shoes shown previously. The shoe to the right may be of leather and molded plastic for the sole/platform. According to the SCAD professor leading our gallery tour, none of the models have ever fallen while wearing Guo Pei’s shoes, but it cannot have been easy to navigate the catwalk on such footwear.
A WONDERFUL, COLORED VINTAGE POSTCARD depicting a woman from the Middle East, with her servant holding the hookah. Note her much elevated stilted clogs, versus the much lower ones worn by the servant. Obviously, greater height is associated with higher status. It is not possible to determine if both are barefoot, but the servant is so clad. Courtesy of Michael Backman, London.
WOMEN’S CLOTH BOOTS with phoenixes, peonies and lotuses, Kangshi period, 1662-1722. Embroidery, polychrome and metallic-wrapped silk threads on silk satin; soles of wood core covered with cotton, leather trim and layers of felted paper. This type of rigid sole enabled standing on stirrups, as Manchurian women were capable horsepeople. Courtesy of Freer/Sackler.

JAPANESE RAIN CLOGS, of wood, leather (?), cord; early 20th century. Courtesy of The Field Museum of Natural History, previously published in Ornament (24/4, 2001). Photographs by Robert K. Liu, Patrick R. Benesh-Liu, unless noted.

Heatbending Bamboo with a Jig
INTERTWINED BLACK BAMBOO EARRING, heatbent with one culm; includes brass armature, silver earwire, precious coral and old glass trade beads and Coverlite. Earrings 11.5 - 12.2 cm long. Photographs by Robert K. Liu/Ornament.
A long bout of the flu last year and being busy with work precluded much experimenting with my black bamboo jewelry. This Spring, I took time to try out some new ideas. Like a dog with a good bone, an idea with good possibilities needs considerable gnawing before the marrow is reached. Intertwined bamboo has always attracted me, although the technique has limitations as you can only intertwine perhaps three thicker culms and they have to be relatively thin (less than 1.0 cm in diameter), so as to be easily heated to become pliable enough to intertwine. Often, only two culms could be easily intertwined, like the earrings I show here. Also, you may have only enough strength to twist three thicker culms while hand-holding both ends and heating the middle areas until it is pliable enough for intertwining. In addition, it may be necessary to have fairly freshly harvested culms to make really tightly intertwined bamboo, which then need to dry after heatbending.
This year, southern California is again in the midst of another severe drought, so our black bamboo grove was not doing well. Instead of growing straight, some culms were bent. I decided to harvest some of the thinner side culms from these bent plants to see if I could try using them for heatbending with a jig. I wanted to have more than 3 culms and heatbend/twist them so that they enclosed a space, somewhat like basketry. The second image shows the first 5 experiments, with the jigs shown for four of the results. I tied 4 to 6 thin culms together at one end with copper or brass wire; this end was held in a vise while I heated and started twisting the culms, each of which had a jig inserted to hold part of the culms apart while I heated and twisted them. Because one end was held in a vise, I could tightly twisted the bundled culms, which were bound with wire before being released from the vise. At first, I settled on a maximum of five culms, as this number was most manageable. Later, using larger jigs and thinner culms, I doubled this number and even did 12 thin culms at the end.
The jigs ranged from soldered wire matrices, a large, 6- sided metal nut, a large bicone glass bead, to grooved pieces of PVC pipe or a carved wood one. The final jig was a thin piece of a bamboo culm that was left in place, as part of the pendant structure. The wire ones do not work, as they are not strong enough to withstand the compressive forces as the culms are heated and twisted. After the jig was inserted and the culms were initially heated/twisted, I clamped the lower end of the bulged culms with wire, sometimes in more than one place to hold everything in place. After each phase of heatbending, the bamboo culms were immediately dipped into water to set or harden them. Usually, it took repeated heating and manipulations to get the intertwined shape I wanted.
For the uppermost batch of freshly harvested or culled culms in the second photo, I used a large glass bead as the jig; for the others, a grooved piece of PVC irrigation pipe or a handcarved, grooved wood plug served as jigs. The grooves were to hold the culms in place while I heated and twisted. If the grooves were not deep enough or shaped correctly with a file, they would not hold the culms in place when heated and twisted. This resulted in the culm slipping out of place, so that spacing was not symmetrical. Sometimes a wire was tied around the culms and the jig, as shown in the second experiment, of the second photo.
I wore leather gloves on both hands to manipulate and hold the culms while everything was heated with my EZ torch; this propane and air torch was held in an armature so that both of my hands were free. The most successful jig is the lowest one, a thin slice of PVC pipe with a groove for each of the culms in the bunch. By shortening the jig, I got the most graceful curve in the cagelike bulge. The jig is easily removed by turning it sideways and slipping it out through an open space.
I felt the lowest heatbent bamboo with a short pipe jig and another one with an even larger diameter PVC pipe jig were good enough to use as pendants with heatbent bamboo torques, as seen in the third photo. The other photographs show in progress and finished images of the two pendants and their torques. All fittings are of copper or brass, so that they will oxidize and stay in character with the rustic, natural feel of these necklaces. While these bundled/jigged bamboo pendants have that lyrical quality that I have been trying to achieve, I was still not really happy with the result. Thus I made more elaborate plastic pipe jigs, using portions of pipe slices, which permited oval and even more elaborate jigs, with more surfaces for slots to hold culms.

FIVE HEATBENT BLACK BAMBOO EXPERIMENTS, four with jigs still inserted or placed alongside. The pipe jigs are 2.2 to 2.7 cm diameters. You can see how the diameter and length of the jig determines how much flare, the angle of the flare and gracefulness of the bamboo culms surrounding the jig. Note wire holding culms in place; all binding wire needs to be annealed before.

TWO HEATBENT BLACK BAMBOO EXPERIMENTS, in progress, with jigs still in place, which are 2.7-3.3 cm diameters. Jigs removed by turning sideways. Charring of pipe due to torch flame. When finished as pendants, one horizontal, one vertical, they were respectively 18.5 and 22.0 cm wide or long. Partially wirewrapped and with coral or turquoise beads.

ADDITIONAL PENDANT EXPERIMENTS WITH PLASTIC PIPE JIGS, which are glued together with New Glue, and grooved or notched with files, to hold bamboo culms in place while being heatbent and twisted.
The final ten notch plastic jig, which allowed for ten thin bamboo culms to be used, produced the most satisfying pendant, although it took repeated heatbending, adjusting and waiting for the freshly culled bamboo to dry thoroughly before the final wire-wrapping. While freshly harvested or culled bamboo is the most pliable and best to use when heatbending with a jig, the downside is that it will shrink when it dries. This means that if you wire-wrap too soon, in order to hold the heatbent culms together, the wirewrapping with annealed 26 gauge wire may become too loose when the culms dried. I have had to re-wrap some of the jig bent structures. Use temporary binding wire while the bamboo dries, tighening the wire further as the bamboo shrinks; after there is no more shrinkage of the bamboo, do the final wire-wrapping.
With greater time experimenting, I was able to produce more interesting shapes with jigged heatbent bamboo, as well as more tightly twisted structures. Much depends on how thin the culm can be for easier heatbending/twisting, yet still hold their strength during these processes and have a large enough diameter to be drilled/burred if necessary.
An important factor is that once the wires that initially clamp together the bundles are released so that the final, more decorative wirewrapping can be added, there is the danger during this transition that the bundled structure will change its shape or even fall apart. Then one has to reconstruct it, with varying degrees of success. Thus, keep the temporary binding wires in place until the final wirewrapping is done.
In September, I tried another idea, where I made a jig from a large diameter bamboo culm, notched with 12 grooves and then sawed off into a thin disk. The grooves were further deepened and refined to hold the 12 thin culms, then used as a jig like the removable plastic ones I had utilized previously. This bamboo jig is meant to be part of the pendant. The most difficult part of the process is fitting all the 12 culms into the grooves and keeping them in place while using temporary wire ties on the upper and lower ends of the culm bundle. I show a partially finished pendant, before wire-wrapping and insertion of the loop. I am still thinking of how to finish this piece but I think the bamboo slice adds an attractive feature. I show a partially finished pendant, before wire-wrapping and insertion of the loop; the last series of images are of the completion process. I wire-wrapped upper and lower portions of the pendant with the permanent bamboo jig, as well as adding a forged/soldered copper loop. Then I cut off the culms below the lower wirewrap, to shorten the pendant. This was then placed on an intertwinned bamboo torque, with wire-wrapped ends; as all the copper was annealed, it took on heat coloring, so all the metal is in harmony with the browns/blacks of the bamboo.
After this summer’s experiments with heatbending with a jig, I think that the most successful jigs will be those with the largest diameter and the thinnest jig, which means the pendant can be shorter and larger or fatter, instead of being long and thinner. Shorter pendants are easier to wear, and larger diameter ones will show better. With bamboo jewelry, excessive weight is never a problem. Undoubtedly, I will continue to gnaw further on this problem, but I may have to wait until the fall/winter rains to help the black bamboo grove recover before I cull anymore.
In the Workshop section of the Ornament website, you can find more of my jewelry projects. If you are interested in jewelry and clothing, please visit us at www.ornamentmagazine.org or purchase the current issue or backissues at www.ornamentmagazine.org/shop.
TEN CULM PENDANT, after additional heatbending/twisting; note that bulged part of pendant shortens with twisting and portions of culms tied off with wires become more intertwined.
TEN CULM JIG PENDANT, showing initial heatbending/twisting and with temporary wire ties. Note how culms form basket around jig.

IN PROGRESS VIEW OF VERTICAL JIGGED PENDANT ON BAMBOO TORQUE, showing it attached by a soldered copper loop, meant to rest in a groove filed into the center node of the torque. Each of the ends of the culm that will be decorated with beads or balls are burred prior, so that the attachments sit in a depression and not on the surface of the culm node.
DETAIL OF COPPER LOOP AND WIRE WITH LARGE KNOB, which is trapped by the bundled bamboo culms when it is wire-wrapped with thin, annealed 26 gauge copper wire, used on all these bamboo jewelry.
HORIZONTAL JIGGED PENDANT ON BAMBOO TORQUE, with faceted Czech glass beads as terminals on torque; pendant hangs from two soldered, forged copper loops. Pendant has been wire-wrapped and the ends decorated with semiprecious stone beads or melted copper balls. Because heatbent black bamboo retains its pliability, the wearer can pull the ends apart when fitting it onto the neck.

DETAIL OF SUSPENSION LOOP AND ENDS OF HORIZONTAL PENDANT. Hole was drilled through bundled culms, end of loop inserted, then bent into circle to trap it in place. To add visual interest, ends of wirewrapping and ends of bamboo culms were decorated with lapis, turquoise or coral beads and copper balls; these sit in burred depressions. Because copper suspension loops are forged for strength and thus thin when viewed headon, the pendant appears to float beneath the toque.

FINISHED TORQUE WITH VERTICAL JIGGED PENDANT OF FIVE CULMS; the torque is also terminated with vintage, facetted Czech glass beads from the African trade, with beads of semiprecious stone or copper balls decorating ends of bamboo culms.
CLOSEUP OF FINISHED VERTICAL JIGGED PENDANT, showing how all the ends of the bamboo culms have been decorated to add interest and draw attention to them. In addition to wirewrapping, some of these bundled culms are held together by pins inserted into drilled holes, to add strength.

CLOSEUP OF JIGGED PENDANT, still with temporary wirebinding and plastic pipe jig in place. Note that individual culms have pleasing curves and the swirled bamboo has much more shape and resemblance to a basket or lattice-work.

ALMOST FINISHED VERTICAL JIGGED PENDANT; the pendant has a soldered copper loop and is wire-wrapped with annealed, fire-colored 26 gauge copper wire, applied after bound culms have thoroughly dried. Vintage Venetian Corneline del Alleppo glass bead has silver topped caps, shown before final assembly with glue. Notice the tight wire-wrapping, which follow the shape of the underlying bamboo culms.

DETAIL OF FINISHED TORQUE WITH VERTICAL JIGGED PENDANT, showing the CdA bead trapped inside jigged space, so that it can freely move. Note silver bead cap and how tight wire-wrapping allows bundled bamboo culms to show through.

FINISHED TORQUE WITH VERTICAL JIGGED PENDANT; the torque is also terminated with vintage molded Czech glass beads from the African trade; these Czech beads also serve to prevent the pendant from coming off the torque, as the beads are larger than diameter of copper loop. The trapped Venetian bead inside the expanded space of the ten culm pendant freely moves. If you compare this pendant with earlier ones, you can easily see how much more basket-like they are, contrasted to those made without jigs.

FINISHED TORQUE AND PENDANT ON FABRICATED BRASS STAND, showing how the jigged pendant hangs. Pendant is 27.7 cm long.

EXPERIMENT TO MAKE INTERTWINED TORQUES, with bottom two unsuccesful, top in process of drying, to be further heatbent. Note wire ties.

LARGE DIAMETER BAMBOO CULM HELD IN VISE, while it is being grooved; it has already been heated with torch to fire-color the surface. After grooving, it will be sawed off as a thin slice and sanded smooth.

CLOSEUP OF OBVERSE OF GROOVED BAMBOO JIG, before it was used for 12 culm pendant.

UNDERSIDE OF BAMBOO JIG, showing that it is nearly hollow, with only a thin layer of the culm in the center.

FINISHED PREVIOUS JIGGED PENDANT AND TORQUE versus in process pendant with permanent bamboo jig, which needs some repair and wire-wrapping, as well as a loop.

IN PROCESS BAMBOO PENDANT, with thin slice of bamboo culm as permanent jig; note temporary wire ties for this 12 culm pendant.

COMPLETED PENDANT ON INTERTWINED TORQUE, not yet finished.

FINISHED PENDANT AND TORQUE, with wire-wrapped near ends of intertwined torque. Pendant is 17.0 cm long, torque 12.5 cm wide. Neckpiece is held in 2 rod arms of armature for photography.

CLOSEUP OF FINISHED PENDANT AND PORTION OF TORQUE, with lower culms sawed off.

PENDANT WITH BAMBOO JIG, top wire-wrapped.

PENDANT WITH PERMANENT BAMBOO JIG, with top and bottom wire-wrapped, and culms below lower wirewrap sawed off, to shorten pendant. Forged/soldered copper loop inserted.

Insect Jewelry 8/2017


Click Images for Captions

Butterfly pins, probably from Santa Domingo Pueblo and possibly made from late 1920s to 1950s. Often called Depression jewelry, as they were made from non-precious or low-cost materials like phonograph records/battery cases, other plastics and gypsum, as well as turquoise. Because we walked through the Philips galleries rather quickly, due to the volume of material, I did not have time to record the captions on the displays. These bear some similarity to polymer butterflies made in recent years. Courtesy of the Wheelwright Museum, as are the last two images.
I have a long interest in insect jewelry (1993, 1997, 1998, 2001). No cultural group makes as many representations of insects as do Native Americans, as butterflies and dragonflies have symbolic importance to many tribes. On our road trip to New Mexico in July, I was able to see and photograph some wonderful antique examples of butterfly pins and one dragon fly pin from those on at exhibit at Jonathan Hill’s booth at the Traveler’s Market in Santa Fe, when I gave a lecture on Prehistoric Southwest Jewelry. Unfortunately, since the Market was closed, there were no lights on in any of the displays, so I had to shoot at high ISO through the glass cases. Thus, these images are somewhat pixalated and not very sharp. These vintage pieces show styles and techniques that one rarely sees today and have a terrific animated quality, although they are less anatomically correct than contemporary examples of such jewelry.
I looked through our considerable collection of books on Southwest jewelry and could not find much on these vintage pieces. I decided to ask John C. Hill, Scottsdale gallery owner and appraiser for help. “The inlay piece (in first photo) is Zuni and likely from the 1930s. The inlay is usually made by Zuni craftsman and the silver work by Navajos. But generally called Zuni Inlay. The butterflies could be Navajo, most likely, or Hopi, because there were far fewer Hopi smiths than Navajo. These generally are after the WWII GI Bill. The Zuni inlay is rarely marked. The butterflies would be marked more often. But again generally Indian silver work is not marked before 1970”.
We also toured the very impressive Jan and Lauris Philips Center for the Study of Southwestern Jewelry with curator Cheri Falkenstien-Doyle of the Wheelwright Museum. I was able to photograph a few vintage butterfly pins, as well as more contemporary butterfly and cicada pins by well-known Native American jewelers.
Just in this small sample of insect jewelry, one can readily see the evolution of styles, materials and techniques, which make such jewelry so collectible and of interest to jewelry historians.

Contemporary cicada brooch of turquoise and gold (?) by Liz Wallace; note how the shadow enhances the appearance of this jewelry, seemingly suggesting that it is in flight. Cicada imagery in jewelry was used by both ancient Hohokam and Navajo (Liu 1998, 2001). The cicada is among Wallace’s favorite insects and also of importance in Chinese culture.

A butterfly with turquoise wings, most likely also made by Liz Wallace, but I cannot be sure. Again, the shadows cast by the exhibition lighting adds to interest.
REFERENCES:
Liu, R. K. 1993 Butterfly Jewelry. Ornament 16 (3): 16-17.
—1997 Dragonfly Brooches. Ornament 20 (4): 24-25.
—1998 The Symbolic Importance of Insects in Jewelry. Ornament 22 (1): 38-43.
—2001 The Symbolic Importance of Insects in Jewelry. Transactions of the American Entomological Society 127 (2): 167-171.

Nail Hammer Workshop 4/2017
It all begins with an idea.

NAIL HAMMER WITH BAMBOO HANDLE I made in about 2010, from a 6 or 8 penny nail that was forged and hand-filed to shape, then wrapped with copper wire. This example was recently donated to the Mingei International Museum for their hand tool collection.
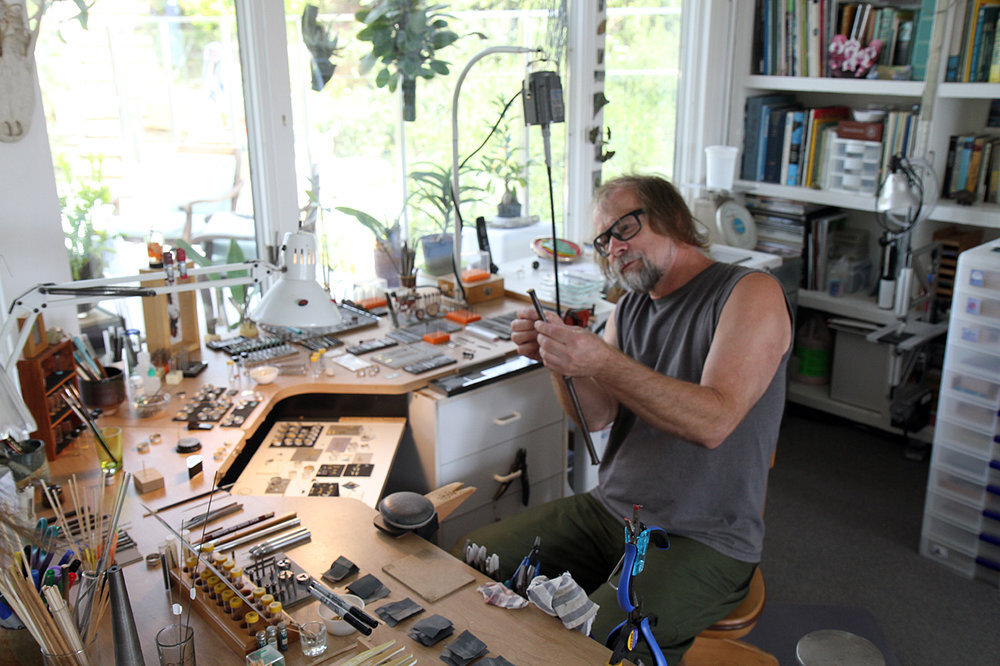
In late April I did a nail hammer workshop graciously hosted by Trish McAleer and David Freda. About 2010 Ken Bova, a jeweler whom we have covered several times in Ornament (31.5, 2008), told me he had made riveting hammers out of nails and chopsticks, when he needed such a hammer and did not have any available (you can see some of his hammers if you Google Ken Bova). Even though I had never seen Ken’s hammers, I made some in 2010 from large nails and spikes, and gave some to my son Jon and one to Phil Audia, a multi-talent craftstperson. Later, I wrote about these hammers and other artist-made or designed tools (Ornament 33.5, 2010). Earlier this year, I donated one to the Mingei International Museum, after I saw their show on hand tools.
On Friday afternoon, I drove north to Trish and David’s house, to give a nail hammer workshop that only lasted 3 hours before attendees had to leave. Besides myself, the workshop participants included Trish, David, Ketarah, LaVerne, Pat and Wendy. I had brought material for nail heads, black bamboo handles and wire for lashing on the nail heads but Trish had provided more appropriate standard and masonry nails. Using a belt sander/disk sander and shaft-mounted grinding wheels, we were able to grind/polish the heads much faster than if we hand filed the nails to shape. Their triangular shape made gripping the nails difficult in a vise, so resorting to machine grinding was a better and quicker alternative. As David and Trish’s spanking clean studio is mainly used for enameling, soldering and casting, I felt our sawing and grinding was the equivalent of being bulls in their china shop, but fortunately we did the dirty work mainly on the deck or in the garage workshop. David was a great help to the participants, in grinding, drilling and torchwork, while Trish was the first to complete her nail hammer project. In between working with the workshop attendees, I was able to get a brief look at David’s next project, of casting life-size honeybees, which he may have been working on since late 2016, when I was gathering material for an article on his orchid and butterfly jewelry (Ornament 39.2, 2016). Overcoming a lot of technical problems, he is almost ready to make an orchid brooch with honeybees, which are greatly threatened worldwide by pesticides, parasites and other assaults on their numbers. They treated me to an exceptional sushi dinner, among the best I have ever had in southern California. As both Trish and David are avid divers and naturalists, dinner conversation was like being with my biologist friends, thoroughly enjoyable.
After I got home, during the weekend, I decided to make one of the masonry nails into a hammer, by hand grinding, filing and wet-dry sandpaper, a much more laborious process then using an electric belt/disc sander. Now I have four nail or spike hammers, with faces ranging from approximately 0.4 to 1.4 cm high, which are used when small surfaces are worked on or if the space is too tight for conventional metalworking hammers. I was not happy with the way I had lashed the new hammers and re-lashed older ones where the wire had loosened, so I re-did the lashing on one new and two older hammers. I still want to improve the wrapping or lashing process with wire, as I feel many times it is not tight enough, nor esthetically pleasing. I want to try adapting Polynesian lashing methods to nail hammers, and may ask Steve Myhre, a very talented New Zealand carver friend, who does beautiful Polynesian lashing on his stone and shell jewelry, for some advice.
The 6 and 8 penny nails, as well as the galvanized spikes are much softer and easier to file/ground than the hardened masonry and standard nails, as well as having very different shapes. Thus the resulting hammer faces are widely varying in shape and result in hammers of differing heft and weight.
I very much enjoy forging and hand filing, although I do appreciate the speed, convenience and fine finish possible with electric sanders and grinding wheels. With hand forging and hand filing, the craftsperson has much more control, and improves neural-muscular skills through the repeated motions required in these processes. There is something very satisfying in slowly bringing the metal nail to a shape you desire, especially when your file is cutting well. But the masonry nail was so hard that I feel I should now re-sharpen my files, using a liquid honing process advertised by Boggs Tools of Paramount, CA.

OLDER NAIL, SPIKE AND DOG CHEW HAMMERS made by author; I had planned that we would make examples of such hammers for the workshop but we did not have sufficient time. The dog chew hammers function well as miniature rawhide hammers.

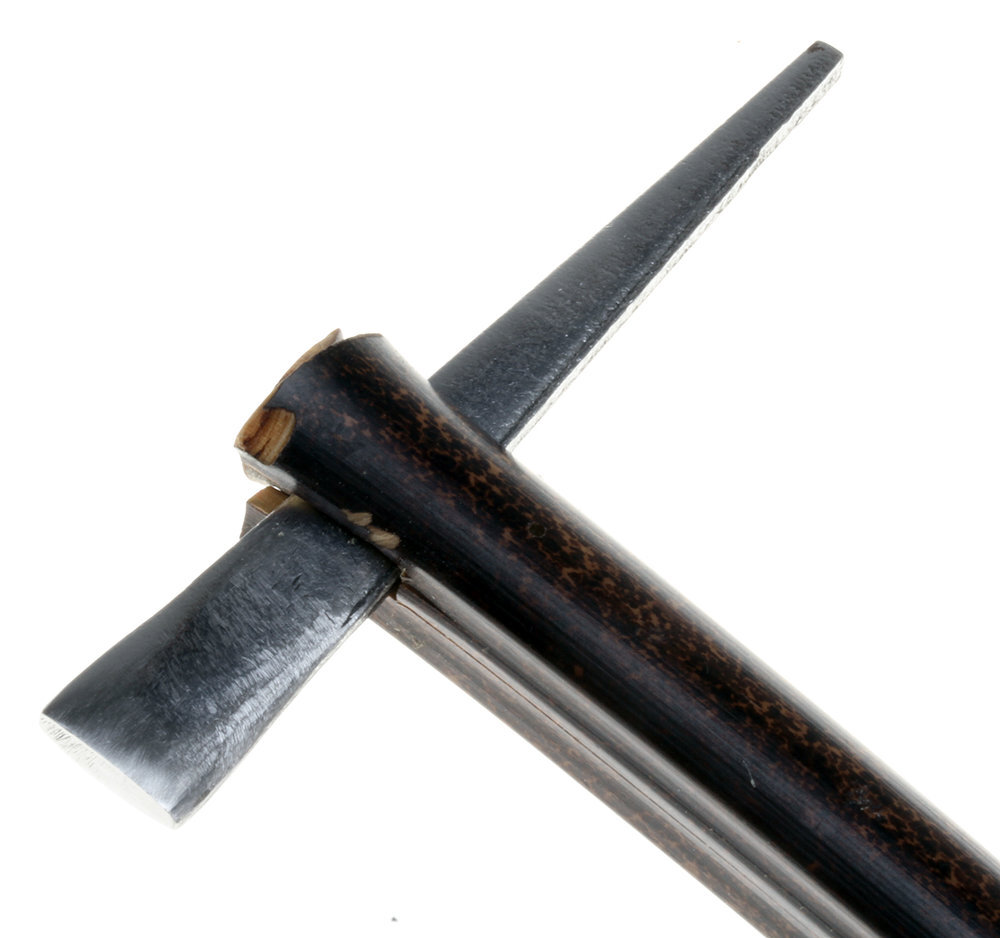
COMPARISON OF FORGED/FILED 6 PENNY NAIL HAMMER VS STANDARD NAIL HAMMER MADE IN NAIL WORKSHOP, where the head of the latter has been ground flat and polished. Ebony handled hammer done in 2010. Alongside are standard nail and 8 penny nail, used in older and newer hammers. Note the very different heads and faces that result from the two different types of nails, and that of electrical grinding vs hand filing.

SPIKE, NAILS, BLACK BAMBOO AND WIRE for lashing hammer heads to handles. The spike is galvanized. Due to lack of time and more appropriate nails provided by Trish, we only used the bamboo handles and wire with balled end for workshop.

COMPARISON OF STANDARD AND MASONRY NAILS ON BOTTOM TO SPIKE AND 6/8 PENNY NAILS ON TOP. Due to lack of time, only the smaller, tapered standard nails were used. Sizes range from ca. 9.5 to 20.0 cm long. A piece of round dog chew leather is also shown.

SPIKE, NAILS, STANDARD AND MASONRY NAILS: when used, the heads are cut off the 6/8 penny nails and spikes, whereas the heads are used as the faces of the hammers for the standard and masonry nails. These are so hard it is easier to just grind the heads to shape, rather than forge/grind new ones.
DAVID FREDA PREPARING TO DRILL A HOLE IN BLACK BAMBOO HANDLE for anchoring the copper or brass wire that will be used to lash the nail onto the handle. Note how precisely everything is arranged on his bench and the great light. We felt like bulls in their china shop.

TRISH WAS THE FASTEST IN MAKING THE MOST PROGRESS on her nail hammer; here the ground/polished standard nail has been fitted into the bamboo handle prior to being lashed with annealed copper wire.

KETARAH SHAFFER SAWING SLOT IN HER BAMBOO HANDLE; slot needs to match thickness of prepared nail, which becomes the hammer head. Her ground and polished nail head rests on bench by the vise.

WENDY SHAW FILING SLOT IN BLACK BAMBOO HANDLE of nail hammer. A close fit of the nail into the sawn slot will help keep the hammer tight. This is part of the fastidious jewelry studio of David Freda and Trish McAleer.

NAIL HAMMER IN VISE: workshop participant about to wrap nail in place with wire. The nail is a standard or hard cut masonry nail, provided by Trish McAleer to the class. I think Polynesian lashing techniques with thread might be a feasible alternative way of fastening the nail head to the handle.

NAIL HAMMERS AND NAILS, with ebony handled hammer done in 2010, black bamboo handled one done in recent workshop. Alongside are standard nail and 8 penny nail, used in older and newer hammers.

DAVID FREDA HELPING WENDY melt a ball on end of her copper wire and annealing wire, before it is wrapped or lashed around the nail of her hammer. Annealing makes for tighter lashing.
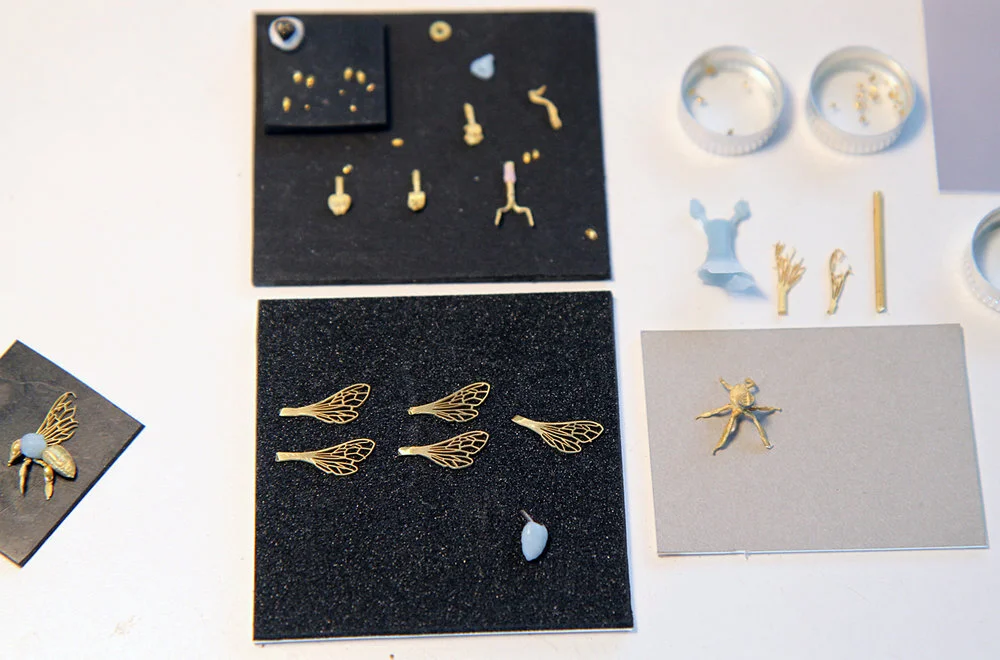
DAVID FREDA’S NEW WORK, of casting the body, legs and wings of honey bees, life size. The body and leg casts are hollow. All the gold parts will be enameled and placed together on cast orchids. Working in this minute size has entailed developing new techniques by Freda, which taken him since late 2016? The blue objects are wax parts not yet cast.

OLDER NAIL HAMMER WITH EBONY HANDLE AND 3 NAIL HAMMERS MADE DURING WORKSHOP, using standard nails ground on electric sanders and wrapped/lashed with copper or brass wire.

RE-LASHED NAIL HAMMER WORKSHOP HAMMER, made with standard nail. I did not like the way I had hurriedly lashed my hammer at the workshop, so I re-did the lashing more carefully and with less copper wire.

HARD CUT MASONRY NAILS, with top as bought by Trish, the lower one hand ground, filed and wet-dry sanded by the author. Due to lack of time in the workshop, which was only about 3 hours, we used sanding belts and disk sander provided by Ketarah, as well as rotary grinders and rubber polishing wheels in David/Trish’s garage studio. Because of the triangular shape, it was hard to grip these nails in a vise for hand filing.
ABOVE NAIL AND BAMBOO HANDLE of hammer in process of being fitted. A slot is cut in the handle, into which the nail slides.

NAIL HAMMER, ADDITIONAL BAMBOO WEDGE AND HANDLE WITH CUT SLOT. The additional wedge will hold the hammer better in the slot and an additional small wedge will be slid in to make the fit even tighter. The final step will be to insert a wire with the end melted back; then the wire will be wrapped or lashed around the nail and fastened. Cyano - acrylic glue will also be used to help hold together the assembly, although the main strength should be through the wire lashing.

OLDER NAIL AND SPIKE HAMMERS VS NEWER ONES MADE WITH MASONRY AND STANDARD NAILS: because the latter two have very highly polished faces, they do not show well in this photograph. The following image will show their faces and bodies.

VERY DIFFERENT FACES, HEADS AND BODIES OF NAIL AND SPIKE HAMMERS: when regular nails or spikes are used, I forge and file the bodies of the hammers, but with hardened standard and masonry nails, only face and head are ground and polished. The faces range from 0.5 to 1.4 cm in size.

Heatbending and Heatshrinking. Light, Coiled And Lyrical. Part III

CLOSEUP OF TIGHT RADIUS BEND PENDANT, COMPARED TO SINGLE AND DOUBLE TIGHT RADIUS BEND EARRINGS; the one on the right is an older pair, made from bamboo harvested and dried for a long period, versus two Coverlite adorned ones on the left which are from freshly culled culms. The positioning of the wire matrix results in either horizontally or vertically oriented panels of red. Both have decorations of red precious coral and sterling silver beads, as well as hand-formed/forged silver earwires. The older example has vintage Bohemian glass, and Ethiopian silver beads for decorations. Earrings are 9.5 - 12.2 cm long.
With the current drought in California, many plants are suffering. I have lost one species of clumping bamboo, another is threatened and my favorite black bamboo is not doing well, with many plants of the grove dying. I am able to cull some of the dying plants before they change to the point where they are not useful for jewelry but others are too far gone. This has prompted me to prune a few thin culms off those struggling but still live grasses, to see how they will heat bend while still fresh. Most were of so small a diameter I would not have used them in the past, except perhaps for intertwined torques or earrings (Liu 2012).
Of the two batches I culled, one was used about a day after cutting; when heated with an acetylene or Orca propane/air torch, these bent very easily around a small diameter wood dowel held upright in a vise. As seen in the first photo of this blog, some were single tight radius bends, others double tight radius bends. Still others were bent into circles at both ends, to act as pendants, with the top bend serving as the bail. In a second batch, used the day after also, the bamboo was still too laden with moisture, so that it was necessary to twist fine copper wire around the bends, to keep them from springing apart after heating and cooling.
These tight radius bend black bamboo components were used as a pendant on an intertwined torque, and two styles of earrings. I felt the bends from freshly culled bamboo had that wonderful lyrical feel reminiscent of plant growth and form that I try to capture in my jewelry. In order to add the color that is suggestive of flowers, or seed pods, I integrated square wire matrices into the bamboo bends, then attached red Coverlite. Since model airplane coverings are films and not fabrics, they do not drape or fit well into small crevices or discontinuities. Therefore when you are working with Coverlite or similar materials, you have to keep gaps to a minimum. In order for such polyester films to really heatshrink, every attachment surface must be uniformly glued. When glued and heatshrunk, this model airplane covering brings both color and pleasing geometric planes into play for these very light, yet strong earrings.
While all of these torques and earrings look fairly easy to make, they in fact require a great deal of work, since no two are really alike, due to the natural variation in both the form/size of the bamboo and how it reacts to heatbending. So time-consuming adjustments have to be made to each piece, rendering each finished jewelry one-of-a-kind.

FRESHLY CUT, THIN BLACK BAMBOO CULMS that were heatbent with a torch about a day or so after culling. A broom handle mandrel was used, to make these single and double tight radius bends. Those on the left were from a batch that still had too much moisture, so the bends needed to be tied with thin copper wire to hold their shape until they dried more. The diameters of the bends were 3.5-3.8 cm.
HEATBENT DOUBLE TIGHT RADIUS BEND CULMS in process of being made into earrings. One of pair has square 18 gauge bronze wire matrix fitted to bent bamboo circle. One end of wire fits into drilled hole, other into a slot filed in upper part of circle. Finished example in last image of blog. Note thin copper wire holding bent bamboo in place while piece is being worked.
COVERLITE GLUED in place but not yet trimmed before heatshrinking. Trimming results in better heatshrinking, reducing crinkling and also eases cleanup.

SINGLE TIGHT RADIUS BEND EARRINGS, with heatshrunk Coverlite on wire matrix, precious coral and sterling silver bead terminations and 18 gauge sterling silver earwire, handformed, forged and buffed. In this type of earring, both ends of the wire matrix are in drilled holes, which are glued into place; ca. 9.5 cm long. Open end of silver earwire worn toward head.
SQUARE BEND TORQUE WITH FOSSIL SHARK TOOTH VS INTERTWINED TORQUE AND PENDANT, latter with freshly cut black bamboo culms. Note how tight the intertwining, as well as the bail of the pendant is also a tight radius bend. This torque is decorated with vintage Bohemian glass rings and beads from the African trade, and Baule brass bead terminations. The 45-70 million years old fossil Lamna shark tooth from Morocco is accentuated with two Cornaline d’ Allepo Venetian beads, which simulate the way Polynesians use red sealing wax to decorate their shark tooth jewelry. The tooth is attached to the bamboo with wrapped, annealed square bronze wire. All photographs by Robert K. Liu/Ornament.
REFERENCES/BIBLIOGRAPHY
Liu, R. K. 2002/2003 Design Experiment. red lantern earrings. Ornament 26 (2): 82-83.
—2010 Design Study. Bamboo Torque. Ornament 33 (3): 70-72.
—2012 Bamboo Jewelry. A Sustainable Resource. Ornament 35 (3): 60-65.
—2014a Matrix Jewelry. Building Light and Volume. Ornament 37 (4): 56-61.
—2014b Photography of Personal Adornment. Photographic Techniques for Jewelry/artwear Craftspeople, Researchers, Scholars and Museum/gallery Staff. San Marcos, Ornament Magazine: 164 p.

The Magic Of Heatshrinking. Light, Volumetric And Colorful. Part II


For the pendants and initial earrings, (which I began working on in June, 2014a), I used silicon bronze brazing rods, as I needed them to be light and strong. I wanted to determine if the wire matrix system and heatshrunk coverings would work as well in earrings, as the combination could produce volumetric and colorful ornaments. However, bronze brazing rods were too heavy for earrings and too thick to easily or neatly bend (even when annealed), so I started using round, sterling silver wire that I forged flat, to both strengthen it with work hardening, as well as to provide more gluing surfaces. As seen in the image with the matrix pendant and earrings (blog, Pt. I), this method worked, but was time-consuming, especially with complex shapes and the fact that I do not like to use pickle. Therefore I clean up firescale mechanically after soldering, which is tedious. However, this is not entirely negative, as the firescale and heat coloring of brass wire during annealing and soldering gives a warm copper tone to the shiny brass, and is much more complementary to the rustic feel I like, especially when paired with black bamboo. What increased additional labor to these sterling silver matrix earrings was my making complex shapes; I wanted trios of three earrings, so that they could be paired and worn in three different ways.
About two months later, I switched to square 18 gauge half-hard brass jeweler’s wire from Rio Grande, soldered onto sterling silver earwires, a better solution. These brass and silver earrings were all much more simple shapes, many formed after annealing, on improvised mandrels, such as beads or wood dowels. As with all jewelry processes, one tries to simplify with experience; for example, the Pod part of the earrings started out as 3 separate pieces of brass wire, soldered together at one end, then closed and soldered with the silver earwire at the other end. Soon, I just notched a piece of square wire at the midpoint, then soldered on a second piece, to form the three wire pod framework, speeding up the work and making a stronger, easier soldering joint.
Since switching to the combination of silver and brass, I have tried a series of earring designs, mostly based on seed pod or fruit shapes. They are exceeding light, weighing between 2 to 3 grams, yet are strong, having a soldered matrix and polyester covering that is designed to withstand hard crashes when a model airplane lands. Their shapes and coverings are colorful, and give the illusion of having large volumes. Taking advantage of the relative ease of making coiled square wire circles, I use these soldered together and expanded asymmetrically for coil earrings, or at right angles to each other, which results in a visually pleasing geometric shape. By utilizing the same method as making jump rings, a wood dowel ensures that all the coils are the same diameter. This is an easy way to make standard components. Different ways of juxtaposing these coils or jump rings produce very different designs. For instance, if the coils are left uncut, a number of them when soldered together at one spot produces a visually pleasing shape when pulled apart where it has not been soldered. The coil matrix earrings are an example. However, it is difficult to glue and have the model airplane coatings adhere to all parts of the coil.
Like my heatbent black bamboo jewelry, these wire matrix earrings with model airplane coverings all require heat to varying degrees, whether to solder metal, heatbend bamboo or heatshrink polyester films. Since my primary job is as a writer/researcher and photographer at Ornament, sporadic opportunities to work in the studio hamper my growth as a jeweler. I feel that my projects with bamboo, wire matrices and high-tech model airplane coverings work well together and have great potential, but I may lack the time or skill to fully develop them. I hope other craftspeople will adopt and work with these materials and techniques.
REFERENCES
Liu, R. K. 2002/2003 Design Experiment. red lantern earrings. Ornament 26 (2): 82-83.
—2010 Design Study. Bamboo Torque. Ornament 33 (3): 70-72.
—2012 Bamboo Jewelry. A Sustainable Resource. Ornament 35 (3): 60-65.
—2014a Matrix Jewelry. Building Light and Volume. Ornament 37 (4): 56-61.
—2014b Photography of Personal Adornment. Photographic Techniques for Jewelry/artwear Craftspeople, Researchers, Sholars and Museum/gallery Staff. San Marcos, Ornament Magazine: 164 p.

The Magic Of Heatshrinking. Light, Volumetric And Colorful. Part I

EARRINGS OF SQUARE BRASS AND ROUND STERLING SILVER WIRE, COVERED WITH COVERLITE OR ULTRACOTE COATINGS; both wires are 18 gauge. Brass square half-hard wire is formed on mandrels, while silver earwire are shaped with pliers and lightly forged. Except for the yellow triple coil earrings, all others have only one or two panels covered. Note that the top pear-shaped earring, covered with Ultracote, has really beautiful curved and complex surfaces caused by the heatshrinking of the model airplane coating. It is better shown in other photographs in next blog. Foreground Pod earring is ca. 7.0 cm long. All these photographs are taken with a Canon 7D, and 60 or 100mm Canon macro lens, and studio strobes, against Tufflock, transiluminated plex or Varitone backgrounds (Liu 2014b). Photographs by Robert K. Liu/Ornament.
I have always believed that earrings were the most frequently worn piece of jewelry, next to necklaces, although I have no hard figures (Liu 1998). In tribal cultures, earrings might be items of personal adornment that are rarely changed, but in Western societies, earrings are switched with the occasion or the mood. Thus, many women usually own large collections of them, since their lower cost relative to other types of jewelry enhances the opportunity of buying more, or of wearers making their own. However, certain generations may now have changed their buying habits and own fewer.
While there may have been studies on what attracts the eye more, the human figure or the face, it is the latter that draws our attention when we look closely at someone. Since I write about jewelry, am a photographer and also a jeweler, I often study what types of earrings are being worn. I like and frequently make discreet and small earrings (with precious materials and/or ethnographic/ancient artifacts); smaller, discreet earrings are probably worn the most but I frequently see large hoop earrings, which often have little visual mass or interest, other than their size. I feel earrings should have both visual interest and good design. I am especially drawn to large, light ear adornment, especially colorful earwear that give a suggestion or a feeling of a flower tucked behind a ear, such as is the practice in some tropical cultures. An example would be the Chinese lantern flower earrings I made in 2002/2003, which give the impression of such flowers dangling from the earlobes, but are actually light, heatshrunk covering over a soldered and formed gold wire matrix. Since these earrings dangle off the earlobe, they easily catch light coming from the front or back. With only one pivot point from the earlobe, they also swing easily, adding eyecatching movement.
When I began to explore combining light, volumetric and colorful pendants to go with my heatbent bamboo jewelry (Liu 2012, 2014a), I returned to using high-tech model airplane coverings that were heatshrunk during or after application to the model plane skeleton, which are often of balsa wood. In my case, I fabricated metal rod matrices, onto which I glued European polyester model airplane coatings of Coverlite or Ultracote, with cyano-acrylic glues. (There are perhaps twenty or more types of coverings for airplane models that fly, of varying thicknesses; I have used about four, some of which were not identified, as they were cutoffs sold in unmarked rolls.) Then I used either torches or heatguns to shrink this covering. Sometimes the heatshrinking created wonderful geometric planes that were aesthetically very pleasing, but often unpredictable and sometimes not repeatable, so pleasing results are sometimes due to serendipity.
Learning what works and what doesn’t is all part of building one’s skillbase. The cost of mistakes is a good tradeoff for growth as a craftsperson. If one does not go beyond his or her safety zone, there is not much chance of innovation. While seemingly trite, work does beget work, and unsuccessful experiments often drive improvement and innovation.
REFERENCES
Liu, R. K. 1998 Ethnographic Earrings. Function and Form. Ornament 21 (4): 38-41.
—2002/2003 Design Experiment. red lantern earrings. Ornament 26 (2): 82-83.
—2010 Design Study. Bamboo Torque. Ornament 33 (3): 70-72.
—2012 Bamboo Jewelry. A Sustainable Resource. Ornament 35 (3): 60-65.
—2014a Matrix Jewelry. Building Light and Volume. Ornament 37 (4): 56-61.
—2014b Photography of Personal Adornment. Photographic Techniques for Jewelry/artwear Craftspeople, Researchers, Sholars and Museum/gallery Staff. San Marcos, Ornament Magazine: 164 p.

HEATGUN VS OXYACETYLENE TORCH, respectively ca. 600 °C and 3100 °C, a difference of about 1500 degrees. Usually, I use an acetylene or propane/air torch to heatbend bamboo and/or solder; these are respectively 2400 and 1980 °C. Heatshrinking polyester can be done with a torch, but is safer with a heatgun.

IN PROCESS FIG/PEAR-SHAPED AND POD EARRING MATRICES, shown with a bakelite bead (3.2 cm diameter), imitation of copal from the African trade, that I used as a forming mandrel for the square wire matrices, which are soldered at top and bottom. Earwires are 18 gauge sterling silver, and bent, forged and buffed smooth.

HEATBENT BAMBOO TORQUE WITH METAL ROD MATRIX PENDANT, of silicon bronze rod covered with Coverlite. The pendant is only covered on three sides and was bent on a vise, then soldered, It was cold-joined to the torque and the Coverlite still needs slight cleanup with files.

COVERLITE MATRIX PENDANT ON HEATBENT BAMBOO TORQUE AND WIRE MATRIX EARRINGS, some of which are in sets of three, to be worn in different asymmetrical pairs, or are an asymmetrical pair, like the yellow/red cube and triangle. In foreground are two pairs of symmetrical Pod earrings, with all red or red/yellow Coverlite skins. Earrings are 5.0-7.5 cm long and weigh between 1.6 to 3.1 grams each, all from 2014.